One of the most utilized pages in Aimbase is the 'Lead Details' page. This page can be accessed in a variety of ways. The 2 most common are from the 'View Lead' button in the lead notification emails often sent to dealers and other members of the organization, and the other is by navigating to 'Leads' | 'View' (in Aimbase) and accessing the records from the leads grid view.
If you access the 'Lead Details' page via the notification emails while you are NOT logged into Aimbase, the 'Lead Details' page will include less information or functionality than when you are logged in and viewing the page.
To access the lead details page from the lead grid view, simply click on the individual lead instance you want to see more information about, and you will be navigated to the lead details page for that lead.
When logged in, most of the time you’ll see the following areas within the 'Lead Details' page:
- Lead Management Toolbar
- Lead Contact Information
- Web Activity (may not always be available)
- Notes
- Contacts
- Integrations (may not always be available)

What is the AI-Generated Prospect Summary?
The AI-Generated Prospect Summary provides a concise overview of a prospect’s activity within Aimbase. Instead of reviewing multiple leads, web sessions, activities, and emails individually, dealers can quickly understand the shopper’s overall engagement in one summarized view.
This summary is generated automatically for eligible leads and is designed to be factual and based on structured data available within the platform.
Where Will You See the Summary?
The Prospect Summary will appear in:
Lead Details Page in Aimbase
Dealer CRM systems (added as a comment on the lead record, when enabled)
This ensures the summary follows the lead across systems so dealers can view the same context wherever they manage their leads.
How Does the Summary Work?
When a new eligible lead is staged:
-
Aimbase gathers relevant prospect data, including:
Previous leads
Web activity
Activities (including digital retail activities)
Email engagement (opens, clicks, etc.)
Purchase history (when available)
That structured data is securely sent to Rollick’s AI service.
The AI generates a structured summary.
The summary is stored and displayed on the Lead Details page.
What does the Summary Provide?
The Prospect Summary helps dealers and OEM users:
Quickly understand a shopper’s recent activity
Identify repeat engagement or previous leads
See high-level behavioral trends without navigating multiple pages
Improve follow-up conversations using relevant context
What Details are in the Lead Management Toolbar?
- Edit – This feature allows the user (primarily the dealer) to update the Follow up Status, Purchase Status and/or Prospect interest of a lead.
- Print – Allows you to send the lead information to printer.
- Timeline – Takes you to the lead’s prospect timeline where you’ll be able to see their lifetime of activity within the platform.
- Delete Lead – Allows the user to delete a single lead. When deleting, you will be asked to provide a reason for why you are doing so. If you delete a lead and the dealer goes back to the link in the email to try to view it, he/she will see the note you’ve left about the reason for deletion.
- Send Lead - Allows the user to send or re-send the lead to contacts at the dealership. If a contact's email previously failed due to a bounce or error, selecting their email address will automatically attempt to remove them from the suppression list before resending.
- Re-assign Lead – This feature allows you to reassign a single lead to a different dealer.
- Re-assign Contact – Allows you to reassign a single lead to a different contact at the dealership the lead is currently assigned to. When you do this, it will change the assigned contact on the lead and resend a lead notification to the newly assigned contact. In order to utilize this feature, the dealer must have more than one email address listed under its dealer contacts section.
- Lead Score - Shows you score totals.
- Copy Link – Is meant to make it easy for you to share a link to a specific lead, especially for members of the organization that don’t have access to Aimbase. Only the lead details on the page will be accessible, this will not grant another person access to any other pages unless he/she is logged in.
- Lead History - Shows you the history of the lead. Here you may find details if a lead had an error.
- View Staging Details - Takes you to the Staging Lead Log
What Details are in Lead Contact Page?
This portion of the page contains pertinent details about the lead, his/her interests and the dealer he/she is assigned to.
Key Details to Note
Last Name – Clicking on the last name will also take you to the prospect timeline. Clicking on the Timeline link takes you directly to the timeline page, whereas clicking on the prospect last name takes you to the prospect timeline in a new window. The prospect timeline is used to show all activity from a person over his/her lifetime within the database. Different types of activity might include leads entered, repeat website visits, email interactions, survey entries, product purchases, and more. You can read more about the prospect timeline here.
Map – This feature will only work properly when the entire address is collected for the lead. Clicking the ‘Click to View’ link will open a new tab that shows the leads address on Google Maps. From here you can look around his/her neighborhood and even utilize the Street View function. This information can often be helpful for lead qualification.
Dealer Distance – The distance shown on the lead is meant to give you an approximation of how near/far a person is from his/her assigned dealer. This number is calculated “as the crow flies” and is based on the dealer’s precise location and the center point of the zip/postal code provided by the individual.

What information is found in Web Activity?
The web activity section offers a lot of great insight into further actions the prospect took while he/she was on your website. Some of the data you could find in this section includes:
Referrer – Is based upon the webpage the person was on prior to landing on your website. Most commonly you might find that this is a Google page, or possible Facebook or another online publication source. Referrer won’t be present every time, but when the lead’s browser and cookie settings allow, Aimbase will capture this information and include it with the lead.
Event – This information is included on a lead typically because it was a field included on the lead form the person filled out or because it was part of a tracking URL used to drive the lead to your website (like an ad or an email link).
Medium – Another value captured with tracking URLs. This value can be used to pass in any information that may be valuable to know about how the lead was targeted (ex: July Prospecting Email, or FB Ad August).
Campaign – This information is used to note when a lead was captured as part of a larger marketing campaign. Some examples of when this might be utilized are product launches, evergreen media campaigns, email blasts.
Time On Site – Once a prospect finds his/her way onto the site and the browser is configured to allow for cookies, Aimbase is able to keep track of the pages viewed and the length of time the person spends on the website. This total time is displayed under the Time On Site field.
Page Visits – This field goes hand-in-hand with Time On Site. Where Time On Site tells you how long the person spent on your website, Pages Viewed will give you the detail of which pages he/she was on and how long he/she spent on each page. When you click on the number, a box will appear showing the list of this information. The list is made up of the page titles contained within the SEO of each page that Aimbase is able to pull in from your website.
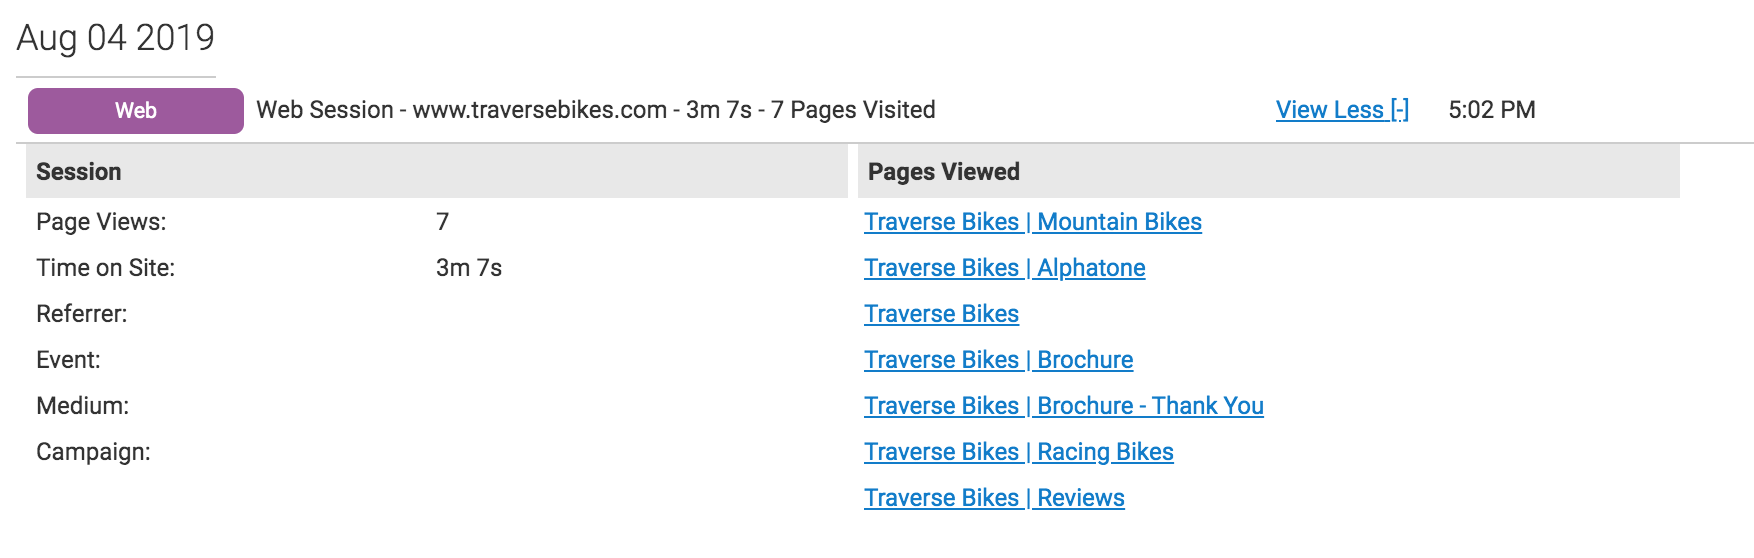 Image Caption

What is the Notes section?
The notes section is available for anyone within the organization who has permission to see the lead. They can see comments from other users and leave comments themselves. This is a great location for dealers to leave notes about follow-up interactions with the prospect or more details about what sort of follow-up attempts have been made. Comments left on the lead will also be pulled in and made visible from the prospect timeline.

What Details are on the Contacts Page?
This section displays all contacts (email addresses) that have received an email notification about the lead you’re looking at.
Name – This column will display the name of all dealer contacts that were setup to receive an email notification on this lead.
Email - This column shows the email address that is on the dealer contact's record. This is the email address that the email notification will be sent to.
Contact Deliverability Status - This column will give you information on the current status of a dealer contact's email address, as it pertains to deliverability. For example, if a contact is listed as "Hard Bounce", that is an indication that the user has been added to the suppression list and may require a resolution. To see more details about a bounce, click the contact's name in the "Name" column.
Types – This column indicates which notification type the contact received. Anything that has the word 'manufacturer' beside it will indicate that the contact is within the OEM/corporate organization. Anything with ‘Lead: Emails To’ next to his/her name is either assigned to the lead (responsible for following up with the person) or was at one time assigned to the lead. Learn more here: Contact Types and Hierarchies
Assigned – In this column you’ll find Yes/No values indicating which contact(s) is/are currently responsible for following up. It is possible that no contacts are assigned.
Send Dealer – Indicates if an email notification is supposed to be sent to the dealer contact.
Delivery - Will tell you how a given dealer contact has interacted with the notification email. Possible values are: Delivered, Opened, Clicked, Failed. A status of 'Clicked' is the only one that will trigger the lead as 'Viewed' unless the assigned contact logs in and views the lead through the platform. If you ever notice that the status is blank, this indicates that the email was not sent. The cause for this varies, but ultimately is a result of a previous failed attempt to send, which at the time would have been labeled as Failed.
Date Last Sent – In this column you’ll find a time stamp noting the last time the notification email was sent to the contact.
Date First Viewed – Indicates the date/time the contact viewed the lead for the first time.

Where do I find the Integrations transaction?
If an Aimbase install has been enabled to pass lead data to a third-party CRM integration, details about that transaction will be available at the very bottom of the lead details page.
Frequently Asked Questions (FAQs)
How do I access the Lead Details page in Aimbase?
You can access the Lead Details page either by:
- Clicking the “View Lead” button in the lead notification email, or
- Navigating to Leads → View within Aimbase and selecting a lead from the grid.
If you open the link from an email while not logged in, you’ll see a simplified version of the page with limited information.
Why does the Lead Details page look different when I’m not logged in?
When you’re not logged in, Aimbase restricts certain fields and functionality for security. Logging into the platform unlocks the full view, including edit tools, notes, web activity, and integrations.
What is the AI-Generated Prospect Summary?
It’s a concise, automatically generated overview of a shopper’s activity across Aimbase. It summarizes leads, web activity, email engagement, digital retail actions, and purchase history (when available), helping dealers understand a prospect quickly without navigating multiple pages.
Where will I see the Prospect Summary?
The summary appears in:
- The Lead Details page in Aimbase
- A dealer’s CRM, where it is added as a comment when enabled
This helps ensure consistent context across systems.
How does the Prospect Summary get created?
When an eligible lead is staged:
- Aimbase gathers structured data such as past leads, website sessions, activities, and email interactions.
- That data is securely sent to Rollick’s AI service.
- A structured summary is generated and stored.
- The summary displays automatically on the Lead Details page.
What does the Lead Management Toolbar allow me to do?
The toolbar includes features to:
- Edit follow-up or purchase status
- Print the lead
- View the timeline
- Delete, send, reassign, or reassign contact for a lead
- View lead score
- Copy the shareable lead link
- Access lead history and staging details
What happens if I delete a lead?
You must provide a reason for deletion. If someone tries to access the lead through a previously shared link, they will see the reason provided.
What does the “Copy Link” function do?
It generates a shareable URL that lets others view the specific lead details without granting access to other Aimbase pages.
The URL includes user-associated parameters so corporate team members can share leads with dealers without marking the lead as viewed.
What information is shown under Lead Contact Information?
This section includes the prospect’s personal details, interests, assigned dealer, distance to the dealer, and address-based mapping. It also provides access to the prospect timeline, which details lifetime interactions across leads, site visits, emails, surveys, and purchases.
How is dealer distance calculated?
Distance is calculated “as the crow flies” based on:
- The dealer’s exact location
- The geographic center of the lead’s provided ZIP/postal code
It’s intended as an approximation for context.
Why might address or location information seem inaccurate?
Aimbase does not alter customer-submitted data. If a customer inputs a mismatched combination—such as a U.S. ZIP code with another country—Aimbase will reflect exactly what was entered.
If a state/province is missing but ZIP/postal code + country are valid, Aimbase will attempt to append the appropriate value.
What kind of information appears in Web Activity?
Depending on browser and cookie settings, you may see:
- Referrer (page the user was on before your site)
- Event, Medium, and Campaign information from tracking URLs
- Time on site, total pages viewed, and detailed page visit logs
This section helps dealers understand what the lead did on the website before submitting their information.
Why might referrer or web activity data be missing?
This occurs when a user’s browser settings block cookies or tracking data, or when certain fields (like campaign parameters) weren’t part of the tracking URL.